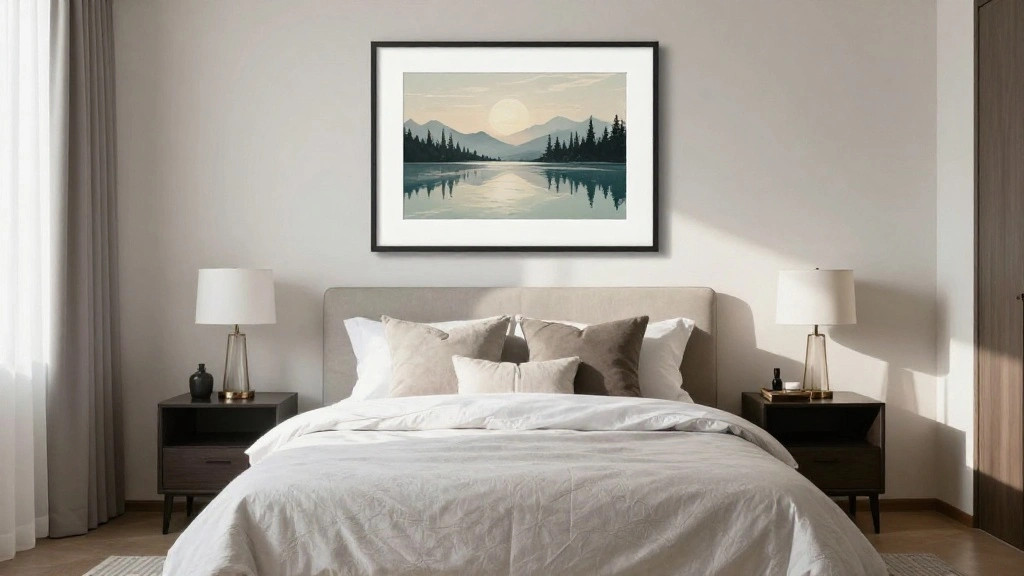
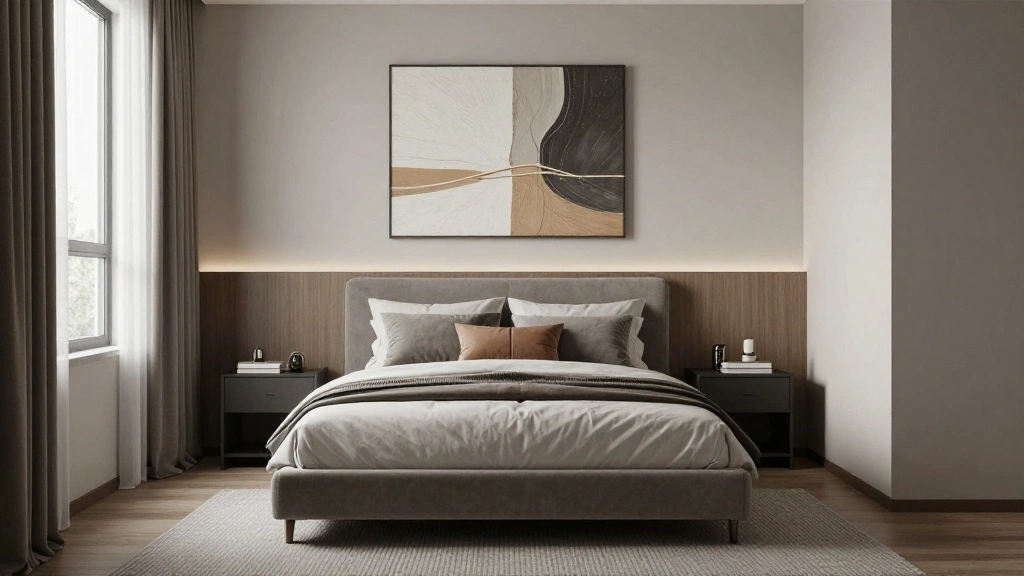
Choosing the right size art for above your bed can seem daunting, but it’s crucial for creating a balanced and inviting space. A poorly sized piece can overshadow your bed or get lost in the wall space, leading to a disjointed look in your bedroom. Don’t let your bedroom miss out on the cohesive aesthetic it deserves!
This guide will help you determine the perfect size art piece that complements your bed and room decor. You’ll learn how to measure your wall space effectively, consider the scale of your bed, and choose art that reflects your personal style. By the end of this guide, you will feel confident in selecting art that enhances your bedroom.
With this beginner-friendly guide, you can accomplish this task in just 30-45 minutes. Let’s get started on transforming your bedroom into a stylish sanctuary!
TL;DR Summary
- Measure the wall space above your bed to determine available dimensions.
- Consider the size of your bed and the overall scale of the room.
- Choose art that resonates with your personal style and complements the room’s decor.
- Follow a step-by-step approach to ensure you select the perfect piece.
TL;DR Summary
Editor’s Choice

KURUI 303Pcs Picture Hanging Kit, Picture Hangers Assorted Kit with Heav…

iBayam 2 Pack Tape Measure Measuring Tape for Body Fabric Sewing Tailor …

International Ring Size Chart Guide Art Poster (9) Canvas Painting Wall …
Prerequisites/Materials Needed
- Measuring tape
- Graph paper or a sketchbook
- Pencil
- Level (for hanging art)
- Hammer and nails or wall adhesive strips
- Artwork options (prints, paintings, etc.)
Prerequisites/Materials Needed
Editor’s Choice

Torpedo Level Magnetic, Firecore 9 Inch Shockproof Small Leveler Tool wi…

Digital Caliper, Sangabery 0-6 inches Caliper with Large LCD Screen, Aut…

Command 20 lb XL 8 Pairs Heavyweight Picture Hanging Strips (16 Strips),…
Skill Level & Time Estimate
Skill Level: Beginner
Total time estimate: 30-45 minutes
Skill Level & Time Estimate
Editor’s Choice

Personalized Custom Canvas Prints: Photo On Canvas (Framed 11X14) Transf…
Digital Caliper, Sangabery 0-6 inches Caliper with Large LCD Screen, Aut…
KURUI 303Pcs Picture Hanging Kit, Picture Hangers Assorted Kit with Heav…
Step 1: Measure the Wall Space

Start by measuring the wall space above your bed. This is crucial to ensure the art fits well and creates a balanced look. Follow these steps:
- Use a measuring tape to find the width of the wall above your bed.
- Measure the height from the top of the bed to the ceiling.
- Note down these measurements on graph paper for easy reference.
Pro Tip: Make sure to measure in inches for accuracy. Why this matters: Knowing the exact dimensions helps you narrow down your art choices significantly.
Time estimate: 5-10 minutes.
Step 1: Measure the Wall Space
Editor’s Choice

CRAFTSMAN 25-Ft Tape Measure with Fraction Markings, Retractable, Self-L…

Zaviko Graph Paper Pad 8.5 x 11, 2 Pack, 4×4 Graph Ruled, Grid Paper Pad…
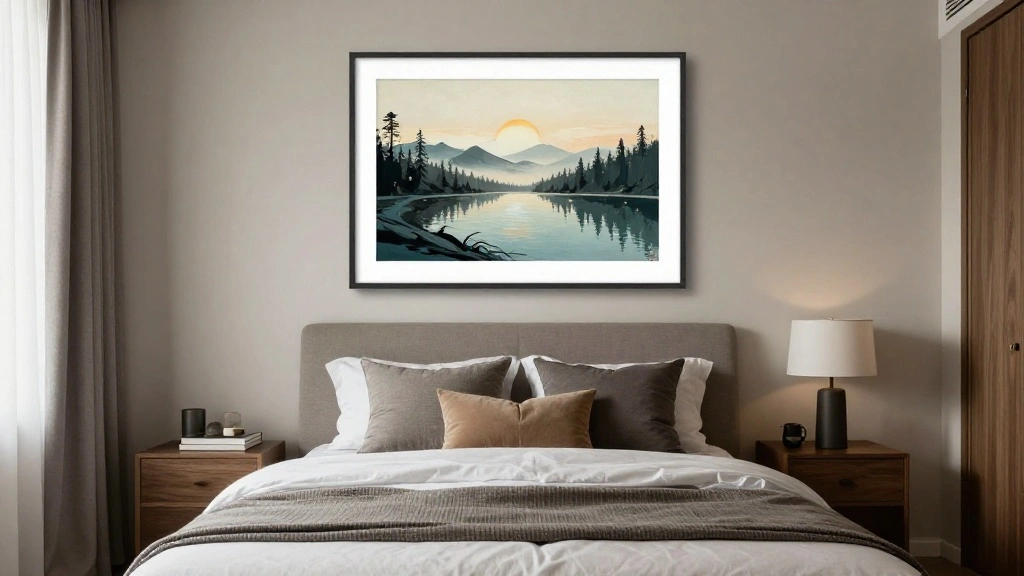
Step 2: Consider the Size of Your Bed
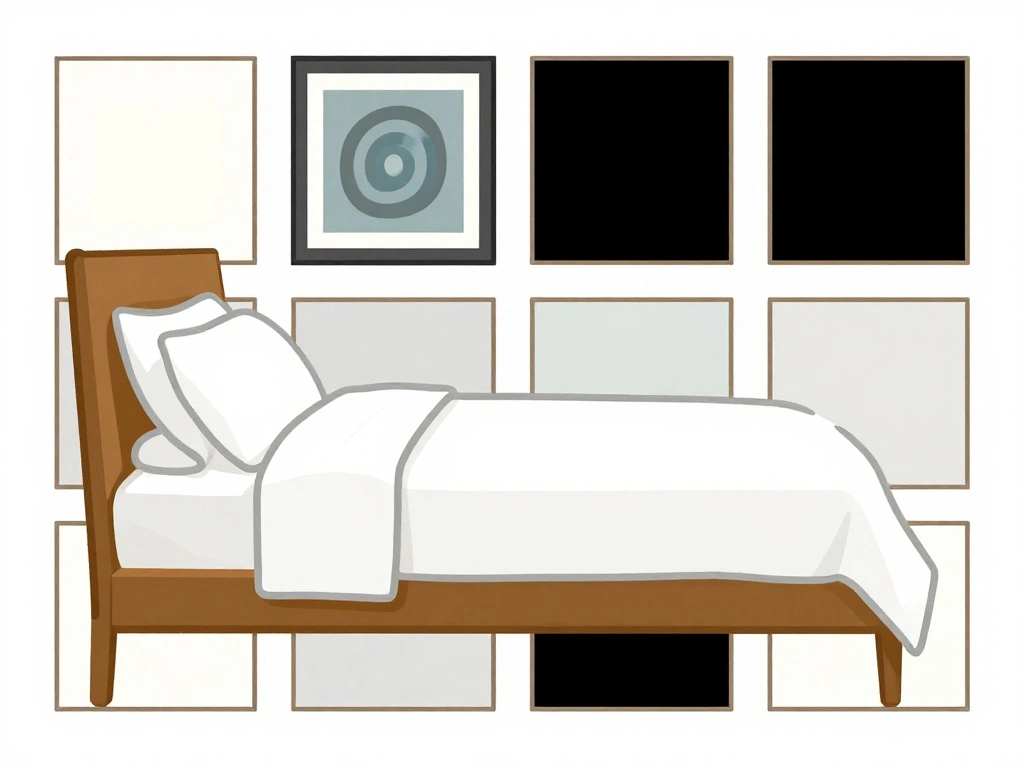
Next, take the size of your bed into account. The width and height of the art piece should relate to the bed size to create harmony in the room. Here’s how:
- Determine the width of your bed (twin, queen, king).
- As a general rule, the artwork’s width should be 60-80% of the bed’s width.
- For height, consider artwork that is 1/3 to 2/3 of the bed’s height.
Warning: Avoid selecting art that is too small, as it may appear lost on the wall. Why this matters: The right proportion creates visual balance and draws the eye to the bed area.
Time estimate: 10-15 minutes.
Step 2: Consider the Size of Your Bed
Editor’s Choice


Personalized Photo to Canvas Print – Canvas Prints With Your Photos on C…
Step 3: Choose the Art Style
Now that you have your measurements, it’s time to consider the style of art that will complement your bedroom decor. Follow these steps:
- Think about the color palette of your room. Choose art that incorporates those colors.
- Decide on a style (abstract, landscape, portrait, etc.) that reflects your personality.
- Look for pieces that evoke a mood you want in your bedroom, such as calmness or energy.
Pro Tip: Consider mixing art styles for a unique look, but ensure they share a common theme. Why this matters: The right art piece enhances the room’s overall vibe and makes it feel cohesive.
Time estimate: 5-10 minutes.
Step 4: Visualize the Art Placement
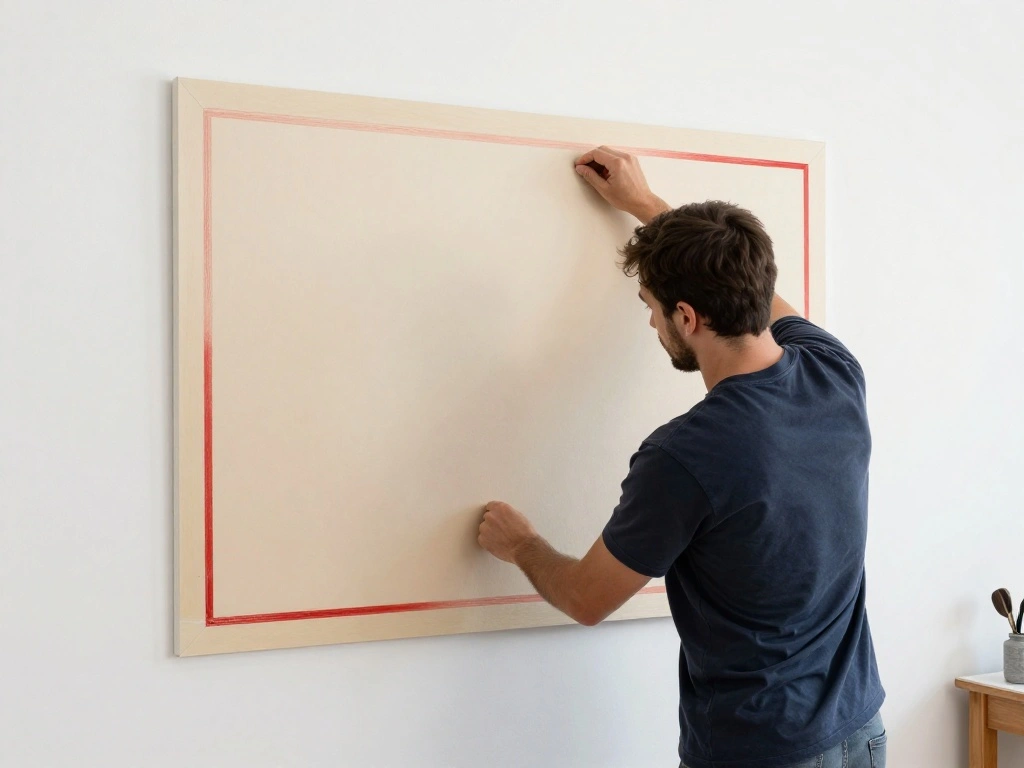
Before making a purchase, visualize how the art will look above your bed. Here’s how:
- Use painter’s tape to outline the size of the art on the wall.
- Step back and assess how it looks in relation to the bed and the room.
- Adjust the tape if needed to find the perfect positioning.
Warning: Don’t rush this step; take your time to ensure the placement feels right. Why this matters: Visualizing the art helps you avoid costly mistakes and ensures you are happy with your choice.
Time estimate: 10-15 minutes.
Step 4: Visualize the Art Placement
Editor’s Choice

Black Woman Wall Art Set of 4 Modern African American Canvas Prints, Vin…

1 Packs Artist Tape Medium Tack White Art Tape for Watercolor Paper Draf…
KURUI 303Pcs Picture Hanging Kit, Picture Hangers Assorted Kit with Heav…
Step 5: Find the Right Art Piece

With all measurements and visualizations complete, it’s time to find the right art piece. Do this:
- Search online marketplaces or local art shops with your size specifications in mind.
- Filter results based on your chosen style and color palette.
- Consider custom art options if you can’t find the perfect fit.
Pro Tip: Look for discounts or sales to find quality art at a better price. Why this matters: Finding the right piece enhances your bedroom’s aesthetic and reflects your personal taste.
Time estimate: 10-20 minutes.
Step 5: Find the Right Art Piece
Editor’s Choice

InSimSea Framed Canvas Wall Art Vintage Decor, Landscape Wall Art, Meado…
Personalized Custom Canvas Prints: Photo On Canvas (Framed 11X14) Transf…
Step 6: Prepare for Hanging the Art
Once you have your art piece, it’s time to prepare for hanging it. Follow these steps:
- Gather your hanging tools (level, hammer, nails, or adhesive strips).
- Decide whether you want to hang the art or use an alternative method, like a shelf.
- Ensure the wall surface is clean and free of dust.
Warning: Make sure you use appropriate tools for your wall type (drywall, concrete, etc.). Why this matters: Proper preparation ensures that your art will hang securely and look great.
Time estimate: 10 minutes.
Step 6: Prepare for Hanging the Art
Editor’s Choice

Luocute Picture Hanging Level Tool, Sturdy ABS Material Frame Positionin…
KURUI 303Pcs Picture Hanging Kit, Picture Hangers Assorted Kit with Heav…

Command 15 lb Large Picture Hanging Strips 14 Pairs (28 Strips), Damage-…
Step 7: Hang the Art
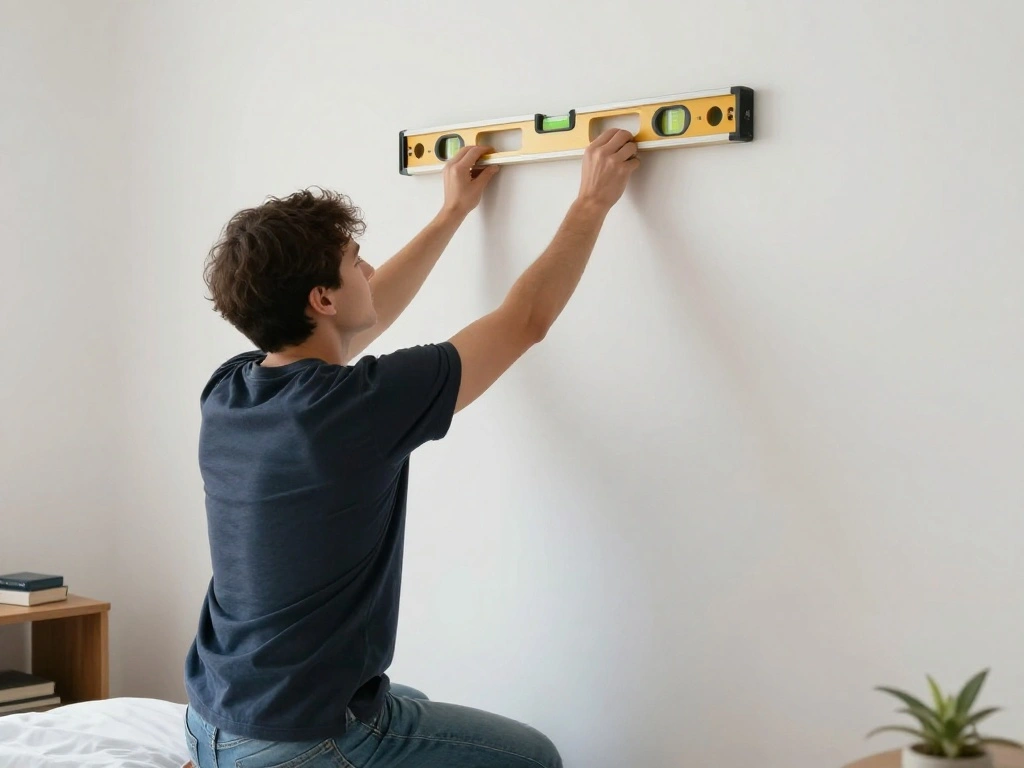
Now it’s time to hang your art piece! Here’s how:
- Position the art on the wall where you visualized it.
- Use a level to ensure it hangs straight.
- Secure it with nails or adhesive strips based on your wall type.
Pro Tip: If using nails, place them slightly above the art frame to ensure they hold securely. Why this matters: Proper hanging techniques ensure your art stays in place and looks its best.
Time estimate: 10-15 minutes.
Step 7: Hang the Art
Editor’s Choice
KURUI 303Pcs Picture Hanging Kit, Picture Hangers Assorted Kit with Heav…

Command 20 lb XL 8 Pairs Heavyweight Picture Hanging Strips (16 Strips),…

PREXISO Multi Surface Laser Level LED Light Vial, 30Ft Horizontal & Vert…
Step 8: Step Back and Assess

After hanging the art, take a moment to step back and assess its placement. Do this:
- Stand at a distance to view the art in relation to the bed and room.
- Check for balance and make adjustments if necessary.
- Consider the lighting and how it impacts the visibility of the art.
Warning: If it doesn’t look right, don’t hesitate to make adjustments. Why this matters: This final evaluation ensures that everything looks cohesive and pleasing to the eye.
Time estimate: 5-10 minutes.
Step 8: Step Back and Assess
Editor’s Choice

STAS Cliprail Picture Hanging System Set – Covers 9.84 ft of Wall Space …
iBayam 2 Pack Tape Measure Measuring Tape for Body Fabric Sewing Tailor …

3Pack Picture Light Battery Operated, 16in Picture Light for Wall, 5000m…
Step 9: Enjoy Your New Look
Congratulations! You’ve successfully chosen and hung the perfect art piece above your bed. Now it’s time to enjoy the new look. Here’s what to do:
- Take a moment to appreciate your hard work and the transformation of your space.
- Consider adding complementary decor items, like pillows or throws, to enhance the overall look.
- Invite friends or family to see your newly styled bedroom!
Pro Tip: Regularly update or change the art for seasonal refreshes! Why this matters: Enjoying your space encourages a positive atmosphere and keeps your home feeling fresh.
Time estimate: 5 minutes.
Step 9: Enjoy Your New Look
Editor’s Choice

Vintage Wall Decor,Gifts to Encourage Women, Bedroom Wall Decor,12″ x 8″…

Inspirational Women Empowerment Gifts Throw Pillow Covers 18×18, She is …

Bedsure GentleSoft White Throw Blanket for Couch – Graduation Gifts Teac…
Pro Tips
- Art Size: Always aim for 60-80% of your bed’s width for art size.
- Layering: Consider layering smaller pieces for a unique look.
- Seasonal Changes: Switch out art based on seasons to keep things fresh.
- Match Frames: Choose frames that match your room’s color scheme.
- Lighting: Use accent lighting to highlight the art piece.
Pro Tips
Editor’s Choice
Tassuowell Rechargeable Picture Light with Remote Control,12 Inch Brass …

upsimples 19 Pack Picture Frames Collage Wall Decor for Mounting or Tabl…

Ring Size Chart Accurate Sizing Guide Poster (3) Canvas Painting Wall Ar…
Common Mistakes to Avoid
Warning: Avoid choosing art that is too small; it can get lost on the wall. Fix: Always check measurements first.
Warning: Hanging art too high can disrupt visual balance. Fix: Aim for eye level or slightly above.
Warning: Ignoring the room’s overall style may lead to clashing decor. Fix: Always consider your existing decor when choosing art.
Common Mistakes to Avoid
Editor’s Choice
PREXISO Multi Surface Laser Level LED Light Vial, 30Ft Horizontal & Vert…

GDMINLO Soft Tape Measure Double Scale Body Sewing Flexible Tailor Craft…

Troubleshooting Section
Problem: The art looks too small above the bed.
Solution: Consider larger pieces or group smaller pieces together to create a gallery effect.
Problem: The art is hung too high.
Solution: Lower it to be at eye level or slightly above the bed.
Problem: The colors clash with the room.
Solution: Select art that incorporates colors already present in your decor.
Problem: The artwork is hard to see.
Solution: Adjust lighting or choose a piece with more contrast against the wall.
Troubleshooting Section
Editor’s Choice
KURUI 303Pcs Picture Hanging Kit, Picture Hangers Assorted Kit with Heav…

Framed Colorful Floral Wall Art Set of 3, Abstract Scandinavian Flower C…

3D Wooden Floral Bathroom Wall Decor (Set of 4) Lightweight, Ready-to-Ha…
Variations/Alternative Methods
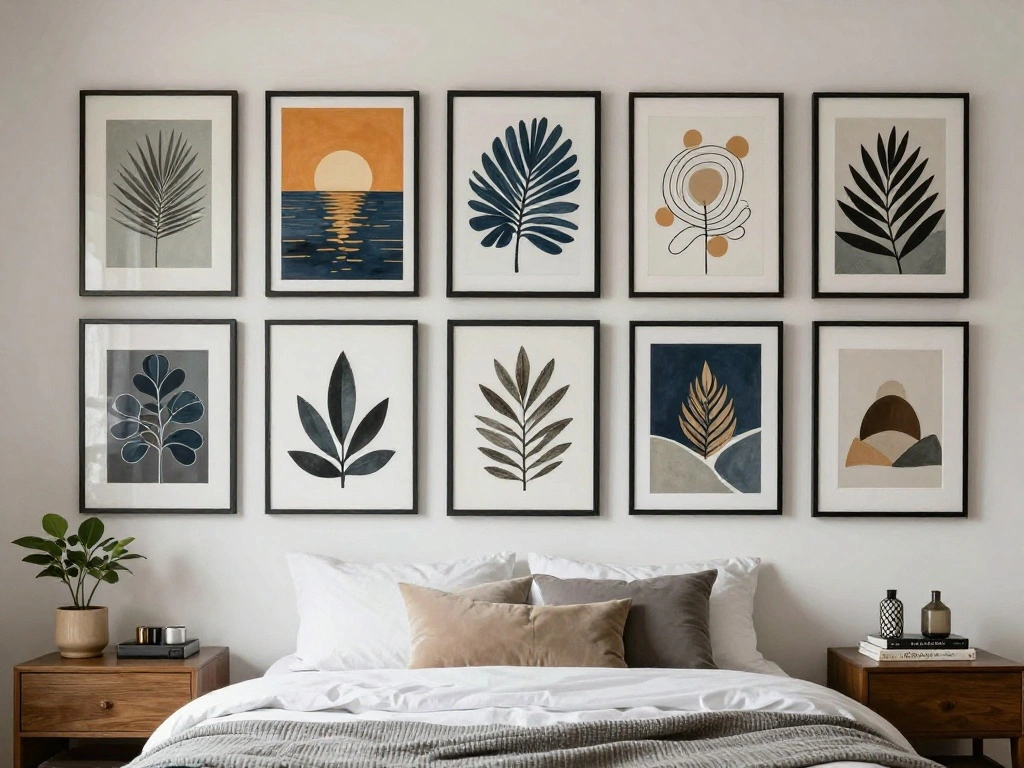
1. Gallery Wall: Instead of one large piece, consider a gallery wall with multiple smaller pieces for a dynamic look. Use a mix of frames and styles for interest.
2. Shelf Display: Install a shelf above the bed to display art and decorative items, allowing for easy rotation of pieces.
3. Textile Art: Use a tapestry or fabric piece as art. This can add texture and warmth to the space.
Variations/Alternative Methods
Editor’s Choice
upsimples 19 Pack Picture Frames Collage Wall Decor for Mounting or Tabl…

BlissBlush Long Vertical Wall Hanging Tapestry Woven Boho Farmhouse Deco…

upsimples 6 Pack Acrylic Shelves for Wall Storage, 15″ x 4“ Floating B…
FAQs
What if I don’t have a large enough piece of art? You can create a gallery wall with multiple smaller pieces to fill the space and create visual interest.
How long should I wait before changing the art? Consider switching out artwork every season or whenever you feel like your space needs a refresh.
Is it safe to use adhesive strips for hanging? Yes, if the art isn’t too heavy, adhesive strips are a great option for easy removal and installation.
What if my wall is textured? Use appropriate wall anchors or hooks designed for textured surfaces to ensure a secure hold.
Can I mix different art styles? Yes, as long as they share a common theme or color palette, mixing styles can create a unique and personalized look.
FAQs
Editor’s Choice

JMENGSSFL Vintage Black Women Reading Oval Wall Art Decor, African Ameri…

Fearless Tape – Double Sided for Clothing Body & Dresses (50 Strips) | C…
Black Girl Bathroom Wall Art Set of 3, Fashion Boho Black Woman Canvas W…
Conclusion
Congratulations! You’ve successfully chosen and hung the right size art above your bed. This small but significant change can completely transform your bedroom atmosphere. Remember to regularly update your art to keep the space feeling fresh and inviting.
If you enjoyed this guide, consider exploring additional decor options for your bedroom or other areas of your home. Your space is a reflection of you, so let it shine!